tomcat从启动到接轨Servlet二三事
缘由
也是因为之前自己的不谨慎,在写Java编程方法论-Reactor与Webflux的时候,因觉得tomcat关于connector部分已经有不错的博文了,草草参考了下,并没有对源码进行深入分析,导致自己在录制分享视频的时候,发现自己文章内容展现的和源码并不一致,又通过搜索引擎搜索了一些中文博客的文章,并不尽如人意,索性,自己的就通过最新的源码来重新梳理一下关于tomcat connector部分内容,也是给自己一个警醒,凡事务必仔细仔细再仔细!
参考源码地址: https://github.com/apache/tomcat
关于Java编程方法论-Reactor与Webflux的视频分享,已经完成了Rxjava 与 Reactor,b站地址如下:
Rxjava源码解读与分享:https://www.bilibili.com/video/av34537840
Reactor源码解读与分享:https://www.bilibili.com/video/av35326911
Tomcat的启动过程详解
### 启动与结束Tomcat基本操作
在Linux系统下,启动和关闭Tomcat使用命令操作。
进入Tomcat下的bin目录:1
cd /java/tomcat/bin
启动Tomcat命令:
1 | ./startup.sh |
停止Tomcat服务命令:
1 | ./shutdown.sh |
执行tomcat 的./shutdown.sh后,虽然tomcat服务不能正常访问了,但是ps -ef | grep tomcat 后,发现tomcat对应的java进程未随web容器关闭而销毁,进而存在僵尸java进程。网上看了下导致僵尸进程的原因可能是有非守护线程(即User Thread)存在,jvm不会退出(当JVM中所有的线程都是守护线程的时候,JVM就可以退出了;如果还有一个或以上的非守护线程则JVM不会退出)。通过一下命令查看Tomcat进程是否结束:
1 | ps -ef|grep tomcat |
如果存在用户线程,给kill掉就好了即使用kill -9 pid
启动过程Bootstrap详解
我们接着从startup.sh这个shell脚本中可以发现,其最终调用了catalina.sh start,于是,我们找到catalina.sh里,在elif [ "$1" = "start" ] ;处,我们往下走,可以发现,其调用了org.apache.catalina.startup.Bootstrap.java这个类下的start()方法:
1 | /** |
这里,在服务器第一次启动的时候,会调用其init(),其主要用于创建org.apache.catalina.startup.Catalina.java的类实例:1
2
3
4
5
6
7
8
9
10
11
12
13
14
15
16
17
18
19
20
21
22
23
24
25
26
27
28
29
30
31
32
33
34/**
* org.apache.catalina.startup.Bootstrap
* Initialize daemon.
* @throws Exception Fatal initialization error
*/
public void init() throws Exception {
initClassLoaders();
Thread.currentThread().setContextClassLoader(catalinaLoader);
SecurityClassLoad.securityClassLoad(catalinaLoader);
// Load our startup class and call its process() method
if (log.isDebugEnabled())
log.debug("Loading startup class");
Class<?> startupClass = catalinaLoader.loadClass("org.apache.catalina.startup.Catalina");
Object startupInstance = startupClass.getConstructor().newInstance();
// Set the shared extensions class loader
if (log.isDebugEnabled())
log.debug("Setting startup class properties");
String methodName = "setParentClassLoader";
Class<?> paramTypes[] = new Class[1];
paramTypes[0] = Class.forName("java.lang.ClassLoader");
Object paramValues[] = new Object[1];
paramValues[0] = sharedLoader;
Method method =
startupInstance.getClass().getMethod(methodName, paramTypes);
method.invoke(startupInstance, paramValues);
catalinaDaemon = startupInstance;
}
启动过程Catalina详解
Catalina中start解读
接着,在Bootstrap的start()方法中会调用Catalina实例的start方法:
1 | /** |
在这里面,我们主要关心load(),getServer().start(),对于后者,在它的前后我们看到有启动时间的计算,这也是平时我们在启动tomcat过程中所看到的日志打印输出所在,后面的我这里就不提了。
Catalina中load()解读
首先我们来看load(),这里,其会通过createStartDigester()创建并配置我们将用来启动的Digester,然后获取我们所配置的ServerXml文件,依次对里面属性进行配置,最后调用getServer().init():1
2
3
4
5
6
7
8
9
10
11
12
13
14
15
16
17
18
19
20
21
22
23
24
25
26
27
28
29
30
31
32
33
34
35
36
37
38
39
40
41
42
43
44
45
46
47
48
49
50
51
52
53
54
55
56
57
58
59
60
61
62
63
64
65
66/**
* org.apache.catalina.startup.Catalina
* Start a new server instance.
*/
public void load() {
if (loaded) {
return;
}
loaded = true;
long t1 = System.nanoTime();
initDirs();
// Before digester - it may be needed
initNaming();
// Set configuration source
ConfigFileLoader.setSource(new CatalinaBaseConfigurationSource(Bootstrap.getCatalinaBaseFile(), getConfigFile()));
File file = configFile();
// Create and execute our Digester
Digester digester = createStartDigester();
try (ConfigurationSource.Resource resource = ConfigFileLoader.getSource().getServerXml()) {
InputStream inputStream = resource.getInputStream();
InputSource inputSource = new InputSource(resource.getURI().toURL().toString());
inputSource.setByteStream(inputStream);
digester.push(this);
digester.parse(inputSource);
} catch (Exception e) {
if (file == null) {
log.warn(sm.getString("catalina.configFail", getConfigFile() + "] or [server-embed.xml"), e);
} else {
log.warn(sm.getString("catalina.configFail", file.getAbsolutePath()), e);
if (file.exists() && !file.canRead()) {
log.warn(sm.getString("catalina.incorrectPermissions"));
}
}
return;
}
getServer().setCatalina(this);
getServer().setCatalinaHome(Bootstrap.getCatalinaHomeFile());
getServer().setCatalinaBase(Bootstrap.getCatalinaBaseFile());
// Stream redirection
initStreams();
// Start the new server
try {
getServer().init();
} catch (LifecycleException e) {
if (Boolean.getBoolean("org.apache.catalina.startup.EXIT_ON_INIT_FAILURE")) {
throw new java.lang.Error(e);
} else {
log.error(sm.getString("catalina.initError"), e);
}
}
long t2 = System.nanoTime();
if(log.isInfoEnabled()) {
log.info(sm.getString("catalina.init", Long.valueOf((t2 - t1) / 1000000)));
}
}
这里,这个server从哪里来,我们从digester.addObjectCreate("Server", "org.apache.catalina.core.StandardServer", "className");中可以知道,其使用了这个类的实例,我们再回到digester.push(this); digester.parse(inputSource);这两句代码上来,可知,未开始解析时先调用Digester.push(this),此时栈顶元素是Catalina,这个用来为catalina设置server,这里,要对digester的解析来涉及下:
如解析到<Server>时就会创建StandardServer类的实例并反射调用Digester的stack栈顶对象的setter方法(调用的方法通过传入的name值确定)。digester中涉及的IntrospectionUtils.setProperty(top, name, value)方法,即top为栈顶对象,name为这个栈顶对象要设置的属性名,value为要设置的属性值。
刚开始时栈顶元素是Catalina,即调用Catalina.setServer(Server object)方法设置Server为后面调用Server.start()做准备,然后将StandardServer对象实例放入Digester的stack对象栈中。
getServer().init()
接下来,我们来看getServer().init(),由上知,我们去找org.apache.catalina.core.StandardServer.java这个类,其继承LifecycleMBeanBase并实现了Server,通过LifecycleMBeanBase此类,说明这个StandardServer管理的生命周期,即通过LifecycleMBeanBase父类LifecycleBase实现的init()方法:1
2
3
4
5
6
7
8
9
10
11
12
13
14
15
16//org.apache.catalina.util.LifecycleBase.java
public final synchronized void init() throws LifecycleException {
if (!state.equals(LifecycleState.NEW)) {
invalidTransition(Lifecycle.BEFORE_INIT_EVENT);
}
try {
setStateInternal(LifecycleState.INITIALIZING, null, false);
initInternal();
setStateInternal(LifecycleState.INITIALIZED, null, false);
} catch (Throwable t) {
handleSubClassException(t, "lifecycleBase.initFail", toString());
}
}
于是,我们关注 initInternal()在StandardServer中的实现,代码过多,这里就把过程讲下:
1、调用父类org.apache.catalina.util.LifecycleMBeanBase#initInternal方法,注册MBean
2、注册本类的其它属性的MBean
3、NamingResources初始化 : globalNamingResources.init();
4、从common ClassLoader开始往上查看,直到SystemClassLoader,遍历各个classLoader对应的查看路径,找到jar结尾的文件,读取Manifest信息,加入到ExtensionValidator#containerManifestResources属性中。
5、初始化service,默认实现是StandardService。
i) 调用super.initInternal()方法
ii) container初始化,这里container实例是StandardEngine。
iii) Executor初始化
iv)Connector初始化:
a)org.apache.catalina.connector.Connector Connector[HTTP/1.1-8080]
b) org.apache.catalina.connector.Connector Connector[AJP/1.3-8009]
Catalina中start里的getServer().start()解读
这里,我们可以看到StandardServer的父类org.apache.catalina.util.LifecycleBase.java的实现:1
2
3
4
5
6
7
8
9
10
11
12
13
14
15
16
17
18
19
20
21
22
23
24
25
26
27
28
29
30
31
32
33
34
35
36
37
38
39
40
41
42
43
44
45
public final synchronized void start() throws LifecycleException {
if (LifecycleState.STARTING_PREP.equals(state) || LifecycleState.STARTING.equals(state) ||
LifecycleState.STARTED.equals(state)) {
if (log.isDebugEnabled()) {
Exception e = new LifecycleException();
log.debug(sm.getString("lifecycleBase.alreadyStarted", toString()), e);
} else if (log.isInfoEnabled()) {
log.info(sm.getString("lifecycleBase.alreadyStarted", toString()));
}
return;
}
if (state.equals(LifecycleState.NEW)) {
init();
} else if (state.equals(LifecycleState.FAILED)) {
stop();
} else if (!state.equals(LifecycleState.INITIALIZED) &&
!state.equals(LifecycleState.STOPPED)) {
invalidTransition(Lifecycle.BEFORE_START_EVENT);
}
try {
setStateInternal(LifecycleState.STARTING_PREP, null, false);
startInternal();
if (state.equals(LifecycleState.FAILED)) {
// This is a 'controlled' failure. The component put itself into the
// FAILED state so call stop() to complete the clean-up.
stop();
} else if (!state.equals(LifecycleState.STARTING)) {
// Shouldn't be necessary but acts as a check that sub-classes are
// doing what they are supposed to.
invalidTransition(Lifecycle.AFTER_START_EVENT);
} else {
setStateInternal(LifecycleState.STARTED, null, false);
}
} catch (Throwable t) {
// This is an 'uncontrolled' failure so put the component into the
// FAILED state and throw an exception.
handleSubClassException(t, "lifecycleBase.startFail", toString());
}
}
对于StandardServer,我们关注的是其对于startInternal();的实现,源码不贴了,具体过程如下:
1、触发CONFIGURE_START_EVENT事件。
2、设置本对象状态为STARTING
3、NameingResource启动:globalNamingResources.start();
4、StandardService启动。
i) 设置状态为STARTING
ii) container启动,即StandardEngine启动
iii) Executor 启动
iv) Connector启动:
a)org.apache.catalina.connector.Connector Connector[HTTP/1.1-8080]
b) org.apache.catalina.connector.Connector Connector[AJP/1.3-8009]
终于,我们探究到了我要讲的主角Connector。
Connector解读
Connector构造器
我们由apache-tomcat-9.0.14\conf目录(此处请自行下载相应版本的tomcat)下的server.xml中的Connector配置可知,其默认8080端口的配置协议为HTTP/1.1。1
2
3
4
5<Connector port="8080" protocol="HTTP/1.1"
connectionTimeout="20000"
redirectPort="8443" />
<!-- Define an AJP 1.3 Connector on port 8009 -->
<Connector port="8009" protocol="AJP/1.3" redirectPort="8443" />
知道了这些,我们去看它的代码中的实现:1
2
3
4
5
6
7
8
9
10
11
12
13
14
15
16
17
18
19
20
21
22
23
24
25
26
27
28
29
30
31
32
33
34
35
36
37
38
39
40public Connector() {
this("org.apache.coyote.http11.Http11NioProtocol");
}
public Connector(String protocol) {
boolean aprConnector = AprLifecycleListener.isAprAvailable() &&
AprLifecycleListener.getUseAprConnector();
if ("HTTP/1.1".equals(protocol) || protocol == null) {
if (aprConnector) {
protocolHandlerClassName = "org.apache.coyote.http11.Http11AprProtocol";
} else {
protocolHandlerClassName = "org.apache.coyote.http11.Http11NioProtocol";
}
} else if ("AJP/1.3".equals(protocol)) {
if (aprConnector) {
protocolHandlerClassName = "org.apache.coyote.ajp.AjpAprProtocol";
} else {
protocolHandlerClassName = "org.apache.coyote.ajp.AjpNioProtocol";
}
} else {
protocolHandlerClassName = protocol;
}
// Instantiate protocol handler
ProtocolHandler p = null;
try {
Class<?> clazz = Class.forName(protocolHandlerClassName);
p = (ProtocolHandler) clazz.getConstructor().newInstance();
} catch (Exception e) {
log.error(sm.getString(
"coyoteConnector.protocolHandlerInstantiationFailed"), e);
} finally {
this.protocolHandler = p;
}
// Default for Connector depends on this system property
setThrowOnFailure(Boolean.getBoolean("org.apache.catalina.startup.EXIT_ON_INIT_FAILURE"));
}
对于tomcat8.5以上,其默认就是Http11NioProtocol协议,这里,我们给其设定了HTTP/1.1,但根据上面的if语句的判断,是相等的,也就是最后还是选择的Http11NioProtocol。
Connector初始化与启动
同样,由上一节可知,我们会涉及到Connector初始化,也就是其也会继承LifecycleMBeanBase,那么,我们来看其相关initInternal()实现:1
2
3
4
5
6
7
8
9
10
11
12
13
14
15
16
17
18
19
20
21
22
23
24
25
26
27
28
29
30
31
32
33
34
35
36
37
38
39
40
41
42
43
44
protected void initInternal() throws LifecycleException {
super.initInternal();
if (protocolHandler == null) {
throw new LifecycleException(
sm.getString("coyoteConnector.protocolHandlerInstantiationFailed"));
}
// Initialize adapter
adapter = new CoyoteAdapter(this);
protocolHandler.setAdapter(adapter);
if (service != null) {
protocolHandler.setUtilityExecutor(service.getServer().getUtilityExecutor());
}
// Make sure parseBodyMethodsSet has a default
if (null == parseBodyMethodsSet) {
setParseBodyMethods(getParseBodyMethods());
}
if (protocolHandler.isAprRequired() && !AprLifecycleListener.isAprAvailable()) {
throw new LifecycleException(sm.getString("coyoteConnector.protocolHandlerNoApr",
getProtocolHandlerClassName()));
}
if (AprLifecycleListener.isAprAvailable() && AprLifecycleListener.getUseOpenSSL() &&
protocolHandler instanceof AbstractHttp11JsseProtocol) {
AbstractHttp11JsseProtocol<?> jsseProtocolHandler =
(AbstractHttp11JsseProtocol<?>) protocolHandler;
if (jsseProtocolHandler.isSSLEnabled() &&
jsseProtocolHandler.getSslImplementationName() == null) {
// OpenSSL is compatible with the JSSE configuration, so use it if APR is available
jsseProtocolHandler.setSslImplementationName(OpenSSLImplementation.class.getName());
}
}
try {
protocolHandler.init();
} catch (Exception e) {
throw new LifecycleException(
sm.getString("coyoteConnector.protocolHandlerInitializationFailed"), e);
}
}
这里涉及的过程如下:
1、注册MBean
2、CoyoteAdapter实例化,CoyoteAdapter是请求的入口。当有请求时,CoyoteAdapter对状态进行了处理,结尾处对请求进行回收,中间过程交由pipeline来处理。
3、protocolHandler 初始化(org.apache.coyote.http11.Http11Protocol)
在这一步中,完成了endpoint的初始化
关于启动就不说了,其设定本对象状态为STARTING,同时调用protocolHandler.start();,接下来,就要进入我们的核心节奏了。1
2
3
4
5
6
7
8
9
10
11
12
13
14
15
16
17
18
protected void startInternal() throws LifecycleException {
// Validate settings before starting
if (getPortWithOffset() < 0) {
throw new LifecycleException(sm.getString(
"coyoteConnector.invalidPort", Integer.valueOf(getPortWithOffset())));
}
setState(LifecycleState.STARTING);
try {
protocolHandler.start();
} catch (Exception e) {
throw new LifecycleException(
sm.getString("coyoteConnector.protocolHandlerStartFailed"), e);
}
}
Protocol的相关解读
这里,我们直接从其抽象实现org.apache.coyote.AbstractProtocol.java来看,其也是遵循生命周期的,所以其也要继承LifecycleMBeanBase并实现自己的init()与start()等生命周期方法,其内部都是由相应的自实现的endpoint来执行具体逻辑:1
2
3
4
5
6
7
8
9
10
11
12
13
14
15
16
17
18
19
20
21
22
23
24
25
26
27
28
29
30
31
32
33
34
35
36
37
38
39
40
41
42
43
44
45
46
47
48//org.apache.coyote.AbstractProtocol.java
public void init() throws Exception {
if (getLog().isInfoEnabled()) {
getLog().info(sm.getString("abstractProtocolHandler.init", getName()));
logPortOffset();
}
if (oname == null) {
// Component not pre-registered so register it
oname = createObjectName();
if (oname != null) {
Registry.getRegistry(null, null).registerComponent(this, oname, null);
}
}
if (this.domain != null) {
rgOname = new ObjectName(domain + ":type=GlobalRequestProcessor,name=" + getName());
Registry.getRegistry(null, null).registerComponent(
getHandler().getGlobal(), rgOname, null);
}
String endpointName = getName();
endpoint.setName(endpointName.substring(1, endpointName.length()-1));
endpoint.setDomain(domain);
endpoint.init();
}
public void start() throws Exception {
if (getLog().isInfoEnabled()) {
getLog().info(sm.getString("abstractProtocolHandler.start", getName()));
logPortOffset();
}
endpoint.start();
monitorFuture = getUtilityExecutor().scheduleWithFixedDelay(
new Runnable() {
public void run() {
if (!isPaused()) {
startAsyncTimeout();
}
}
}, 0, 60, TimeUnit.SECONDS);
}
拿org.apache.coyote.http11.Http11NioProtocol这个类来讲,其接收的是NioEndpoint来进行构造器的实现,其内部的方法的具体实现也经由此NioEndpoint来实现其逻辑:1
2
3
4
5
6
7
8
9
10
11
12
13
14
15
16
17
18
19
20
21
22
23
24
25
26
27
28
29
30
31
32
33
34
35
36
37
38
39
40
41
42
43
44
45
46
47
48
49
50
51
52public class Http11NioProtocol extends AbstractHttp11JsseProtocol<NioChannel> {
private static final Log log = LogFactory.getLog(Http11NioProtocol.class);
public Http11NioProtocol() {
super(new NioEndpoint());
}
protected Log getLog() { return log; }
// -------------------- Pool setup --------------------
public void setPollerThreadCount(int count) {
((NioEndpoint)getEndpoint()).setPollerThreadCount(count);
}
public int getPollerThreadCount() {
return ((NioEndpoint)getEndpoint()).getPollerThreadCount();
}
public void setSelectorTimeout(long timeout) {
((NioEndpoint)getEndpoint()).setSelectorTimeout(timeout);
}
public long getSelectorTimeout() {
return ((NioEndpoint)getEndpoint()).getSelectorTimeout();
}
public void setPollerThreadPriority(int threadPriority) {
((NioEndpoint)getEndpoint()).setPollerThreadPriority(threadPriority);
}
public int getPollerThreadPriority() {
return ((NioEndpoint)getEndpoint()).getPollerThreadPriority();
}
// ----------------------------------------------------- JMX related methods
protected String getNamePrefix() {
if (isSSLEnabled()) {
return "https-" + getSslImplementationShortName()+ "-nio";
} else {
return "http-nio";
}
}
}
Endpoint相关解读
这里,EndPoint用于处理具体连接和传输数据,即用来实现网络连接和控制,它是服务器对外I/O操作的接入点。主要任务是管理对外的socket连接,同时将建立好的socket连接交到合适的工作线程中去。
里面两个主要的属性类是Acceptor和Poller、SocketProcessor。
我们以NioEndpoint为例,其内部请求处理具体的流程如下:

结合上一节最后,我们主要还是关注其对于Protocol有关生命周期方法的具体实现:1
2
3
4
5
6
7
8
9
10
11
12
13
14
15
16
17
18
19
20
21
22
23
24
25
26
27
28
29
30
31
32
33
34
35
36
37
38
39
40
41
42//org.apache.tomcat.util.net.AbstractEndpoint.java
public final void init() throws Exception {
if (bindOnInit) {
bindWithCleanup();
bindState = BindState.BOUND_ON_INIT;
}
if (this.domain != null) {
// Register endpoint (as ThreadPool - historical name)
oname = new ObjectName(domain + ":type=ThreadPool,name=\"" + getName() + "\"");
Registry.getRegistry(null, null).registerComponent(this, oname, null);
ObjectName socketPropertiesOname = new ObjectName(domain +
":type=ThreadPool,name=\"" + getName() + "\",subType=SocketProperties");
socketProperties.setObjectName(socketPropertiesOname);
Registry.getRegistry(null, null).registerComponent(socketProperties, socketPropertiesOname, null);
for (SSLHostConfig sslHostConfig : findSslHostConfigs()) {
registerJmx(sslHostConfig);
}
}
}
public final void start() throws Exception {
if (bindState == BindState.UNBOUND) {
bindWithCleanup();
bindState = BindState.BOUND_ON_START;
}
startInternal();
}
//org.apache.tomcat.util.net.AbstractEndpoint.java
private void bindWithCleanup() throws Exception {
try {
bind();
} catch (Throwable t) {
// Ensure open sockets etc. are cleaned up if something goes
// wrong during bind
ExceptionUtils.handleThrowable(t);
unbind();
throw t;
}
}
这两个方法主要调用bind(此处可以查阅bindWithCleanup()的具体实现) 和startlntemal 方法,它们是模板方法,可以自行根据需求实现,这里,我们参考NioEndpoint 中的实现, bind 方法代码如下:1
2
3
4
5
6
7
8
9
10
11
12
13
14
15
16
17
18
19
20
21//org.apache.tomcat.util.net.NioEndpoint.java
public void bind() throws Exception {
initServerSocket();
// Initialize thread count defaults for acceptor, poller
if (acceptorThreadCount == 0) {
// FIXME: Doesn't seem to work that well with multiple accept threads
acceptorThreadCount = 1;
}
if (pollerThreadCount <= 0) {
//minimum one poller thread
pollerThreadCount = 1;
}
setStopLatch(new CountDownLatch(pollerThreadCount));
// Initialize SSL if needed
initialiseSsl();
selectorPool.open();
}
这里的bind 方法中首先初始化了ServerSocket(这个东西我们在jdk网络编程里都接触过,就不多说了,这里是封装了一个工具类,看下面实现),然后检查了代表Acceptor 和Poller 初始化的线程数量的acceptorThreadCount属性和pollerThreadCount 属性,它们的值至少为1。1
2
3
4
5
6
7
8
9
10
11
12
13
14
15
16
17
18
19
20// Separated out to make it easier for folks that extend NioEndpoint to
// implement custom [server]sockets
protected void initServerSocket() throws Exception {
if (!getUseInheritedChannel()) {
serverSock = ServerSocketChannel.open();
socketProperties.setProperties(serverSock.socket());
InetSocketAddress addr = new InetSocketAddress(getAddress(), getPortWithOffset());
serverSock.socket().bind(addr,getAcceptCount());
} else {
// Retrieve the channel provided by the OS
Channel ic = System.inheritedChannel();
if (ic instanceof ServerSocketChannel) {
serverSock = (ServerSocketChannel) ic;
}
if (serverSock == null) {
throw new IllegalArgumentException(sm.getString("endpoint.init.bind.inherited"));
}
}
serverSock.configureBlocking(true); //mimic APR behavior
}
这里,Acceptor 用于接收请求,将接收到请求交给Poller 处理,它们都是启动线程来处理的。另外还进行了初始化SSL 等内容。NioEndpoint 的startInternal 方法代码如下:1
2
3
4
5
6
7
8
9
10
11
12
13
14
15
16
17
18
19
20
21
22
23
24
25
26
27
28
29
30
31
32
33
34
35
36
37
38
39
40
41
42/**
* The socket pollers.
*/
private Poller[] pollers = null;
/**
* Start the NIO endpoint, creating acceptor, poller threads.
*/
public void startInternal() throws Exception {
if (!running) {
running = true;
paused = false;
processorCache = new SynchronizedStack<>(SynchronizedStack.DEFAULT_SIZE,
socketProperties.getProcessorCache());
eventCache = new SynchronizedStack<>(SynchronizedStack.DEFAULT_SIZE,
socketProperties.getEventCache());
nioChannels = new SynchronizedStack<>(SynchronizedStack.DEFAULT_SIZE,
socketProperties.getBufferPool());
// Create worker collection
if ( getExecutor() == null ) {
createExecutor();
}
initializeConnectionLatch();
// Start poller threads
pollers = new Poller[getPollerThreadCount()];
for (int i=0; i<pollers.length; i++) {
pollers[i] = new Poller();
Thread pollerThread = new Thread(pollers[i], getName() + "-ClientPoller-"+i);
pollerThread.setPriority(threadPriority);
pollerThread.setDaemon(true);
pollerThread.start();
}
startAcceptorThreads();
}
}
这里首先初始化了一些属性,初始化的属性中的processorCache 是SynchronizedStack<SocketProcessor>类型, SocketProcessor 是NioEndpoint 的一个内部类, Poller 接收到请求后就会交给它处理, SocketProcessor 又会将请求传递到Handler。
然后启动了Poller 和Acceptor 来处理请求,这里我们要注意的的是,pollers是一个数组,其管理了一堆Runnable,由前面可知,假如我们并没有对其进行设定,那就是1,也就是说,其默认情况下只是一个单线程。这个线程创建出来后就将其设定为守护线程,直到tomcat容器结束,其自然也会跟着结束。
这里,我们想要对其进行配置的话,可以在server.xml中进行相应设定:1
2
3
4
5
6
7
8
9
10
11
12
13
14
15
16
17
18
19
20<Connector port="8080" protocol="org.apache.coyote.http11.Http11NioProtocol"
connectionTimeout="20000"
maxHeaderCount="64"
maxParameterCount="64"
maxHttpHeaderSize="8192"
URIEncoding="UTF-8"
useBodyEncodingForURI="false"
maxThreads="128"
minSpareThreads="12"
acceptCount="1024"
connectionLinger="-1"
keepAliveTimeout="60"
maxKeepAliveRequests="32"
maxConnections="10000"
acceptorThreadCount="1"
pollerThreadCount="2"
selectorTimeout="1000"
useSendfile="true"
selectorPool.maxSelectors="128"
redirectPort="8443" />
启动Acceptor的startAcceptorThreads 方法在 AbstractEndpoint 中,代码如下:1
2
3
4
5
6
7
8
9
10
11
12
13
14
15protected void startAcceptorThreads() {
int count = getAcceptorThreadCount();
acceptors = new ArrayList<>(count);
for (int i = 0; i < count; i++) {
Acceptor<U> acceptor = new Acceptor<>(this);
String threadName = getName() + "-Acceptor-" + i;
acceptor.setThreadName(threadName);
acceptors.add(acceptor);
Thread t = new Thread(acceptor, threadName);
t.setPriority(getAcceptorThreadPriority());
t.setDaemon(getDaemon());
t.start();
}
}
这里的getAcceptorThreadCount 方法就是获取的init 方法中处理过的acceptorThreadCount属性,获取到后就会启动相应数量的Acceptor 线程来接收请求。默认同样是1,其创建线程的方式和Poller一致,就不多说了。
这里,我们再来看下webapps/docs/config/http.xml的文档说明:1
2
3
4
5
6
7
8
9
10
11
12
13
14
15
16
17
18
19<attribute name="acceptorThreadCount" required="false">
<p>The number of threads to be used to accept connections. Increase this
value on a multi CPU machine, although you would never really need more
than <code>2</code>. Also, with a lot of non keep alive connections, you
might want to increase this value as well. Default value is
<code>1</code>.</p>
</attribute>
<attribute name="pollerThreadCount" required="false">
<p>(int)The number of threads to be used to run for the polling events.
Default value is <code>1</code> per processor but not more than 2.<br/>
When accepting a socket, the operating system holds a global lock. So the benefit of
going above 2 threads diminishes rapidly. Having more than one thread is for
system that need to accept connections very rapidly. However usually just
increasing <code>acceptCount</code> will solve that problem.
Increasing this value may also be beneficial when a large amount of send file
operations are going on.
</p>
</attribute>
由此可知,acceptorThreadCount用于设定接受连接的线程数。 在多CPU机器上增加这个值,虽然你可能真的不需要超过2个。哪怕有很多非keep alive连接,你也可能想要增加这个值。 其默认值为1。pollerThreadCount用于为轮询事件运行的线程数。默认值为每个处理器1个但不要超过2个(上面的优化配置里的设定为2)。接受socket时,操作系统将保持全局锁定。 因此,超过2个线程的好处迅速减少。 当系统拥有多个该类型线程,它可以非常快速地接受连接。 尽管增加acceptCount就可以解决这个问题。但当正在进行大量发送文件操作时,增加此值也可能是有益的。
Acceptor和Poller的工作方式
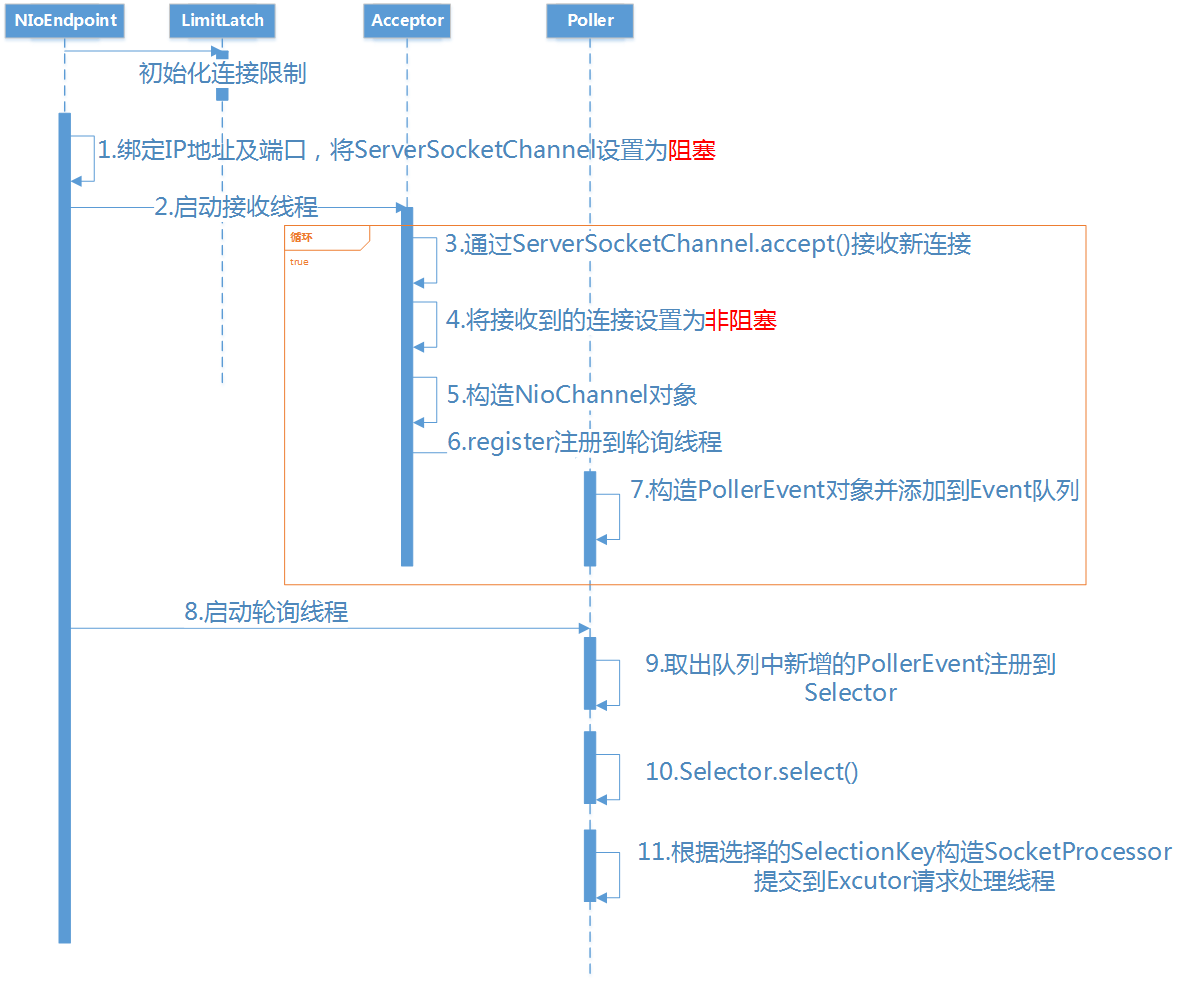
我们先来看一张NioEndpoint处理的的时序图:
Acceptor工作方式
我们由前面可知,Acceptor和Poller都实现了Runnable接口,所以其主要工作流程就在其实现的run方法内,这里我们先来看Acceptor对于run方法的实现:
1 | //org.apache.tomcat.util.net.NioEndpoint.java |
由上面run方法可以看到,Acceptor使用serverSock.accept()阻塞的监听端口,如果有连接进来,拿到了socket,并且EndPoint处于正常运行状态,则调用NioEndPoint的setSocketOptions方法,对于setSocketOptions,概括来讲就是根据socket构建一个NioChannel,然后把这个的NioChannel注册到Poller的事件列表里面,等待poller轮询:1
2
3
4
5
6
7
8
9
10
11
12
13
14
15
16
17
18
19
20
21
22
23
24
25
26
27
28
29
30
31
32
33
34
35
36
37
38
39
40
41
42
43
44
45
46
47
48
49
50
51
52
53
54
55
56
57
58
59/**
* org.apache.tomcat.util.net.NioEndpoint.java
* Process the specified connection.
* 处理指定的连接
* @param socket The socket channel
* @return <code>true</code> if the socket was correctly configured
* and processing may continue, <code>false</code> if the socket needs to be
* close immediately
* 如果socket配置正确,并且可能会继续处理,返回true
* 如果socket需要立即关闭,则返回false
*/
protected boolean setSocketOptions(SocketChannel socket) {
// Process the connection
try {
//disable blocking, APR style, we are gonna be polling it
socket.configureBlocking(false);
Socket sock = socket.socket();
socketProperties.setProperties(sock);
//从缓存中拿一个nioChannel 若没有,则创建一个。将socket传进去
NioChannel channel = nioChannels.pop();
if (channel == null) {
SocketBufferHandler bufhandler = new SocketBufferHandler(
socketProperties.getAppReadBufSize(),
socketProperties.getAppWriteBufSize(),
socketProperties.getDirectBuffer());
if (isSSLEnabled()) {
channel = new SecureNioChannel(socket, bufhandler, selectorPool, this);
} else {
channel = new NioChannel(socket, bufhandler);
}
} else {
channel.setIOChannel(socket);
channel.reset();
}
//从pollers数组中获取一个Poller对象,注册这个nioChannel
getPoller0().register(channel);
} catch (Throwable t) {
ExceptionUtils.handleThrowable(t);
try {
log.error(sm.getString("endpoint.socketOptionsError"), t);
} catch (Throwable tt) {
ExceptionUtils.handleThrowable(tt);
}
// Tell to close the socket
return false;
}
return true;
}
/**
* Return an available poller in true round robin fashion.
*
* @return The next poller in sequence
*/
public Poller getPoller0() {
int idx = Math.abs(pollerRotater.incrementAndGet()) % pollers.length;
return pollers[idx];
}
关于getPoller0(),默认情况下, 由前面可知,这个pollers数组里只有一个元素,这点要注意。我们来看NioEndPoint中的Poller实现的register方法,主要做的就是在Poller注册新创建的套接字。
1 | /** |
对以上过程进行一下总结:
从Acceptor接收到请求,它做了如下工作:
- 如果达到了最大连接数,则等待。否则,阻塞监听端口。
- 监听到有连接,则创建一个socketChannel。若服务正常运行,则把socket传递给适当的处理器。如果成功,会关闭socket。
在这里,会调用NioEndPoint的setSocketOptions方法,处理指定的连接:
- 将socket设置为非阻塞
- 从缓存中拿一个nioChannel 若没有,则创建一个。将socket传进去。
- 从pollers数组中获取一个Poller对象,把nioChannel注册到该Poller中。
其中最后一步注册的过程,是调用Poller的register()方法:
- 创建一个NioSocketWrapper,包装socket。然后配置相关属性,设置interestOps为SelectionKey.OP_READ
- 从缓存中取出一个PollerEvent对象,若没有则创建一个。初始化或者重置此Event对象,会将其interestOps设置为OP_REGISTER (Poller轮询时会用到)
- 将新的PollerEvent添加到这个Poller的事件列表events,等待Poller线程轮询。
Poller工作方式
由前面可知,poller也实现了Runnable接口,并在start的这部分生命周期执行的过程中创建对应工作线程并加入其中,所以,我们来通过其run方法来看下其工作机制。
其实上面已经提到了Poller将一个事件注册到事件队列的过程。接下来Poller线程要做的事情其实就是如何处理这些事件。
Poller在run方法中会轮询事件队列events,将每个PollerEvent中的SocketChannel的interestOps注册到Selector中,然后将PollerEvent从队列里移除。之后就是SocketChanel通过Selector调度来进行非阻塞的读写数据了。1
2
3
4
5
6
7
8
9
10
11
12
13
14
15
16
17
18
19
20
21
22
23
24
25
26
27
28
29
30
31
32
33
34
35
36
37
38
39
40
41
42
43
44
45
46
47
48
49
50
51
52
53
54
55
56
57
58
59
60
61
62
63
64
65
66
67
68
69
70
71
72
73
74
75
76
77
78
79
80
81
82
83
84
85
86
87
88
89
90
91
92
93
94
95
96
97
98
99
100
101
102/**
* Poller class.
*/
public class Poller implements Runnable {
private Selector selector;
private final SynchronizedQueue<PollerEvent> events =
new SynchronizedQueue<>();
private volatile boolean close = false;
private long nextExpiration = 0;//optimize expiration handling
private AtomicLong wakeupCounter = new AtomicLong(0);
private volatile int keyCount = 0;
public Poller() throws IOException {
this.selector = Selector.open();
}
public int getKeyCount() { return keyCount; }
public Selector getSelector() { return selector;}
/**
* The background thread that adds sockets to the Poller, checks the
* poller for triggered events and hands the associated socket off to an
* appropriate processor as events occur.
*/
public void run() {
// Loop until destroy() is called
// 循环直到 destroy() 被调用
while (true) {
boolean hasEvents = false;
try {
if (!close) {
//遍历events,将每个事件中的Channel的interestOps注册到Selector中
hasEvents = events();
if (wakeupCounter.getAndSet(-1) > 0) {
//if we are here, means we have other stuff to do
//do a non blocking select
//如果走到了这里,代表已经有就绪的IO Channel
//调用非阻塞的select方法,直接返回就绪Channel的数量
keyCount = selector.selectNow();
} else {
//阻塞等待操作系统返回 数据已经就绪的Channel,然后被唤醒
keyCount = selector.select(selectorTimeout);
}
wakeupCounter.set(0);
}
if (close) {
events();
timeout(0, false);
try {
selector.close();
} catch (IOException ioe) {
log.error(sm.getString("endpoint.nio.selectorCloseFail"), ioe);
}
break;
}
} catch (Throwable x) {
ExceptionUtils.handleThrowable(x);
log.error(sm.getString("endpoint.nio.selectorLoopError"), x);
continue;
}
//either we timed out or we woke up, process events first
//如果上面select方法超时,或者被唤醒,先将events队列中的Channel注册到Selector上。
if ( keyCount == 0 ) hasEvents = (hasEvents | events());
Iterator<SelectionKey> iterator =
keyCount > 0 ? selector.selectedKeys().iterator() : null;
// Walk through the collection of ready keys and dispatch
// any active event.
// 遍历已就绪的Channel,并调用processKey来处理该Socket的IO。
while (iterator != null && iterator.hasNext()) {
SelectionKey sk = iterator.next();
NioSocketWrapper attachment = (NioSocketWrapper)sk.attachment();
// Attachment may be null if another thread has called
// cancelledKey()
// 如果其它线程已调用,则Attachment可能为空
if (attachment == null) {
iterator.remove();
} else {
iterator.remove();
//创建一个SocketProcessor,放入Tomcat线程池去执行
processKey(sk, attachment);
}
}//while
//process timeouts
timeout(keyCount,hasEvents);
}//while
getStopLatch().countDown();
}
...
}
上面读取已就绪Channel的部分,是十分常见的Java NIO的用法,即 Selector调用selectedKeys(),获取IO数据已经就绪的Channel,遍历并调用processKey方法来处理每一个Channel就绪的事件。而processKey方法会创建一个SocketProcessor,然后丢到Tomcat线程池中去执行。
这里还需要注意的一个点是,events()方法,用来处理PollerEvent事件,执行PollerEvent.run(),然后将PollerEvent重置再次放入缓存中,以便对象复用。1
2
3
4
5
6
7
8
9
10
11
12
13
14
15
16
17
18
19
20
21
22
23
24
25
26/**
* Processes events in the event queue of the Poller.
*
* @return <code>true</code> if some events were processed,
* <code>false</code> if queue was empty
*/
public boolean events() {
boolean result = false;
PollerEvent pe = null;
for (int i = 0, size = events.size(); i < size && (pe = events.poll()) != null; i++ ) {
result = true;
try {
//把SocketChannel的interestOps注册到Selector中
pe.run();
pe.reset();
if (running && !paused) {
eventCache.push(pe);
}
} catch ( Throwable x ) {
log.error(sm.getString("endpoint.nio.pollerEventError"), x);
}
}
return result;
}
所以,PollerEvent.run()方法才是我们关注的重点:1
2
3
4
5
6
7
8
9
10
11
12
13
14
15
16
17
18
19
20
21
22
23
24
25
26
27
28
29
30
31
32
33
34
35
36
37
38
39
40
41
42
43
44
45
46
47
48
49
50
51
52
53
54
55
56
57
58
59
60
61
62
63
64
65
66
67
68
69/**
* PollerEvent, cacheable object for poller events to avoid GC
*/
public static class PollerEvent implements Runnable {
private NioChannel socket;
private int interestOps;
private NioSocketWrapper socketWrapper;
public PollerEvent(NioChannel ch, NioSocketWrapper w, int intOps) {
reset(ch, w, intOps);
}
public void reset(NioChannel ch, NioSocketWrapper w, int intOps) {
socket = ch;
interestOps = intOps;
socketWrapper = w;
}
public void reset() {
reset(null, null, 0);
}
public void run() {
//Acceptor调用Poller.register()方法时,创建的PollerEvent的interestOps为OP_REGISTER,因此走这个分支
if (interestOps == OP_REGISTER) {
try {
socket.getIOChannel().register(
socket.getPoller().getSelector(), SelectionKey.OP_READ, socketWrapper);
} catch (Exception x) {
log.error(sm.getString("endpoint.nio.registerFail"), x);
}
} else {
final SelectionKey key = socket.getIOChannel().keyFor(socket.getPoller().getSelector());
try {
if (key == null) {
// The key was cancelled (e.g. due to socket closure)
// and removed from the selector while it was being
// processed. Count down the connections at this point
// since it won't have been counted down when the socket
// closed.
socket.socketWrapper.getEndpoint().countDownConnection();
((NioSocketWrapper) socket.socketWrapper).closed = true;
} else {
final NioSocketWrapper socketWrapper = (NioSocketWrapper) key.attachment();
if (socketWrapper != null) {
//we are registering the key to start with, reset the fairness counter.
int ops = key.interestOps() | interestOps;
socketWrapper.interestOps(ops);
key.interestOps(ops);
} else {
socket.getPoller().cancelledKey(key);
}
}
} catch (CancelledKeyException ckx) {
try {
socket.getPoller().cancelledKey(key);
} catch (Exception ignore) {}
}
}
}
public String toString() {
return "Poller event: socket [" + socket + "], socketWrapper [" + socketWrapper +
"], interestOps [" + interestOps + "]";
}
}
至此,可以看出Poller线程的作用
- 将Acceptor接收到的请求注册到Poller的事件队列中
- Poller轮询事件队列中,处理到达的事件,将PollerEvent中的通道注册到Poller的Selector中
- 轮询已就绪的通道,对每个就绪通道创建一个SocketProcessor,交由Tomcat线程池去处理
剩下的事情,就是SocketProcessor怎么适配客户端发来请求的数据、然后怎样交给Servlet容器去处理了。
即Poller的run方法中最后调用的processKey(sk, attachment);:1
2
3
4
5
6
7
8
9
10
11
12
13
14
15
16
17
18
19
20
21
22
23
24
25
26
27
28
29
30
31
32
33
34
35
36
37
38protected void processKey(SelectionKey sk, NioSocketWrapper attachment) {
try {
if ( close ) {
cancelledKey(sk);
} else if ( sk.isValid() && attachment != null ) {
if (sk.isReadable() || sk.isWritable() ) {
if ( attachment.getSendfileData() != null ) {
processSendfile(sk,attachment, false);
} else {
unreg(sk, attachment, sk.readyOps());
boolean closeSocket = false;
// Read goes before write
if (sk.isReadable()) {
if (!processSocket(attachment, SocketEvent.OPEN_READ, true)) {
closeSocket = true;
}
}
if (!closeSocket && sk.isWritable()) {
if (!processSocket(attachment, SocketEvent.OPEN_WRITE, true)) {
closeSocket = true;
}
}
if (closeSocket) {
cancelledKey(sk);
}
}
}
} else {
//invalid key
cancelledKey(sk);
}
} catch ( CancelledKeyException ckx ) {
cancelledKey(sk);
} catch (Throwable t) {
ExceptionUtils.handleThrowable(t);
log.error(sm.getString("endpoint.nio.keyProcessingError"), t);
}
}
即从processSocket这个方法中会用到SocketProcessor来处理请求:1
2
3
4
5
6
7
8
9
10
11
12
13
14
15
16
17
18
19
20
21
22
23
24
25
26
27
28
29
30
31
32
33
34
35
36
37
38
39
40
41
42/**
* Process the given SocketWrapper with the given status. Used to trigger
* processing as if the Poller (for those endpoints that have one)
* selected the socket.
*
* @param socketWrapper The socket wrapper to process
* @param event The socket event to be processed
* @param dispatch Should the processing be performed on a new
* container thread
*
* @return if processing was triggered successfully
*/
public boolean processSocket(SocketWrapperBase<S> socketWrapper,
SocketEvent event, boolean dispatch) {
try {
if (socketWrapper == null) {
return false;
}
SocketProcessorBase<S> sc = processorCache.pop();
if (sc == null) {
sc = createSocketProcessor(socketWrapper, event);
} else {
sc.reset(socketWrapper, event);
}
Executor executor = getExecutor();
if (dispatch && executor != null) {
executor.execute(sc);
} else {
sc.run();
}
} catch (RejectedExecutionException ree) {
getLog().warn(sm.getString("endpoint.executor.fail", socketWrapper) , ree);
return false;
} catch (Throwable t) {
ExceptionUtils.handleThrowable(t);
// This means we got an OOM or similar creating a thread, or that
// the pool and its queue are full
getLog().error(sm.getString("endpoint.process.fail"), t);
return false;
}
return true;
}
SocketProcessor处理请求
这里简单提一下SocketProcessor的处理过程,帮助大家对接到Servlet容器处理上。通过上面可以知道,具体处理一个请求,是在SocketProcessor通过线程池去执行的,这里,我们来看其执行一次请求的时序图:
由图中可以看到,SocketProcessor中通过Http11ConnectionHandler,拿到Htpp11Processor,然后Htpp11Processor会调用prepareRequest方法来准备好请求数据。接着调用CoyoteAdapter的service方法进行request和response的适配,之后交给Tomcat容器进行处理。
下面通过一个系列调用来表示下过程:
connector.getService().getContainer().getPipeline().getFirst().invoke(request,response);
这里首先从Connector 中获取到Service ( Connector 在initInternal 方法中创建CoyoteAdapter的时候已经将自己设置到了CoyoteAdapter 中),然后从Service 中获取Container ,接着获取管道,再获取管道的第一个Value,最后调用invoke 方法执行请求。Service 中保存的是最顶层的容器,当调用最顶层容器管道的invoke 方法时,管道将逐层调用各层容器的管道中Value 的invoke 方法,直到最后调用Wrapper 的管道中的BaseValue ( StandardWrapperValve)来处理Filter 和Servlet。
将请求交给Tomcat容器处理后,然后将请求一层一层传递到Engine、Host、Context、Wrapper,最终经过一系列Filter,来到了Servlet,执行我们自己具体的代码逻辑。
至此关于Connector的一些东西就算涉及差不多了,剩下的假如以后有精力的话,继续探究下,接着分享Webflux的解读去。
补充:
感谢零度大佬(博客:http://www.jiangxinlingdu.com)的提问,这里我将自己的一些额外的问题理解进行内容补充:
这里对于其中NioEndpoint中其有关生命周期部分的实现所涉及的initServerSocket()再来关注下细节:1
2
3
4
5
6
7
8
9
10
11
12
13
14
15
16
17
18
19
20// Separated out to make it easier for folks that extend NioEndpoint to
// implement custom [server]sockets
protected void initServerSocket() throws Exception {
if (!getUseInheritedChannel()) {
serverSock = ServerSocketChannel.open();
socketProperties.setProperties(serverSock.socket());
InetSocketAddress addr = new InetSocketAddress(getAddress(), getPortWithOffset());
serverSock.socket().bind(addr,getAcceptCount());
} else {
// Retrieve the channel provided by the OS
Channel ic = System.inheritedChannel();
if (ic instanceof ServerSocketChannel) {
serverSock = (ServerSocketChannel) ic;
}
if (serverSock == null) {
throw new IllegalArgumentException(sm.getString("endpoint.init.bind.inherited"));
}
}
serverSock.configureBlocking(true); //mimic APR behavior
}
其最后一句,为什么tomcat这个不设置非阻塞?这会儿是刚初始化的时候,设定为阻塞状态,阻塞也只是阻塞在这个线程上,即Acceptor在一条线程内执行其run方法的时候,会调用endpoint.serverSocketAccept()来创建一个socketChannel,接收下一个从服务器进来的连接。当成功接收到,重新对此socket进行配置,即会调用endpoint.setSocketOptions(socket),在这个方法内,会调用 socket.configureBlocking(false);,此时,会开启SocketChannel在非阻塞模式,具体代码请回顾本文前面细节。
